Sunday, December 28, 2014

Homemade Headboard

     Our daughter wanted to make a headboard for her IKEA bed.  Paul cut a board from OSB (strandboard).  We used 1/2" board, and it is very reasonable at just $7.97 for a full sheet. This is available at Lowe's, and they will cut it for you also.  Makes it nice to put into the back of the van, instead of a full sized sheet.  So having our height of the headboard measurement along with us, they made the cut. Then back at home Paul cut the board on the left side and the right side, making a 45 degree slant.  This gives it just a little more decorative touch. Paul constructed, using some old pieces of shelving, a backing that would be used to hang the headboard on to the wall.  One piece was cut along the edge at an angle and attached to the wall. Tthe other piece an angle was cut along the edge and this board was attached to the back of the headboard frame.  Then the headboard was simply set onto the wall piece, the two boards messing, and so the headboard is held up securely above the bed. It can also slide along that backing piece to adjust if needed to 'center' it above the bed, moving it leaft or right, if needed.
     She and I visited a Joann Fabrics store and found a piece of velvet-like fabric on the Red-Tag Clearance table, and it was enough to do this headboard. So for just a total of  $11.00 that was a good deal. We purchased some 3" thick dense poly padding too. This was the most expensive thing of the whole project, but using a 50% off coupon, it was $27.00  She wanted to have those hammer-head nails as a detail accent.  To make things easy these days they have available nail heads (in silver, gold and bronze) in a roll, that is very easy to use -- with a 'hole' every couple of inches so a nail can be pounded in.  Makes it so easy not to have to pound in each and every nail head!   Paul had purchased a pneumatic stable gun that I used to make all the bedroom padded cornice boards.  We also have an electric stable gun, but it just doesn't do the job like this great ($50) pneumatic one!  Actually, I think our electric one would be fine too, but I think something broke on it, and the nails were not going into the board nice and cleanly...so he bought this new one.  Love it!
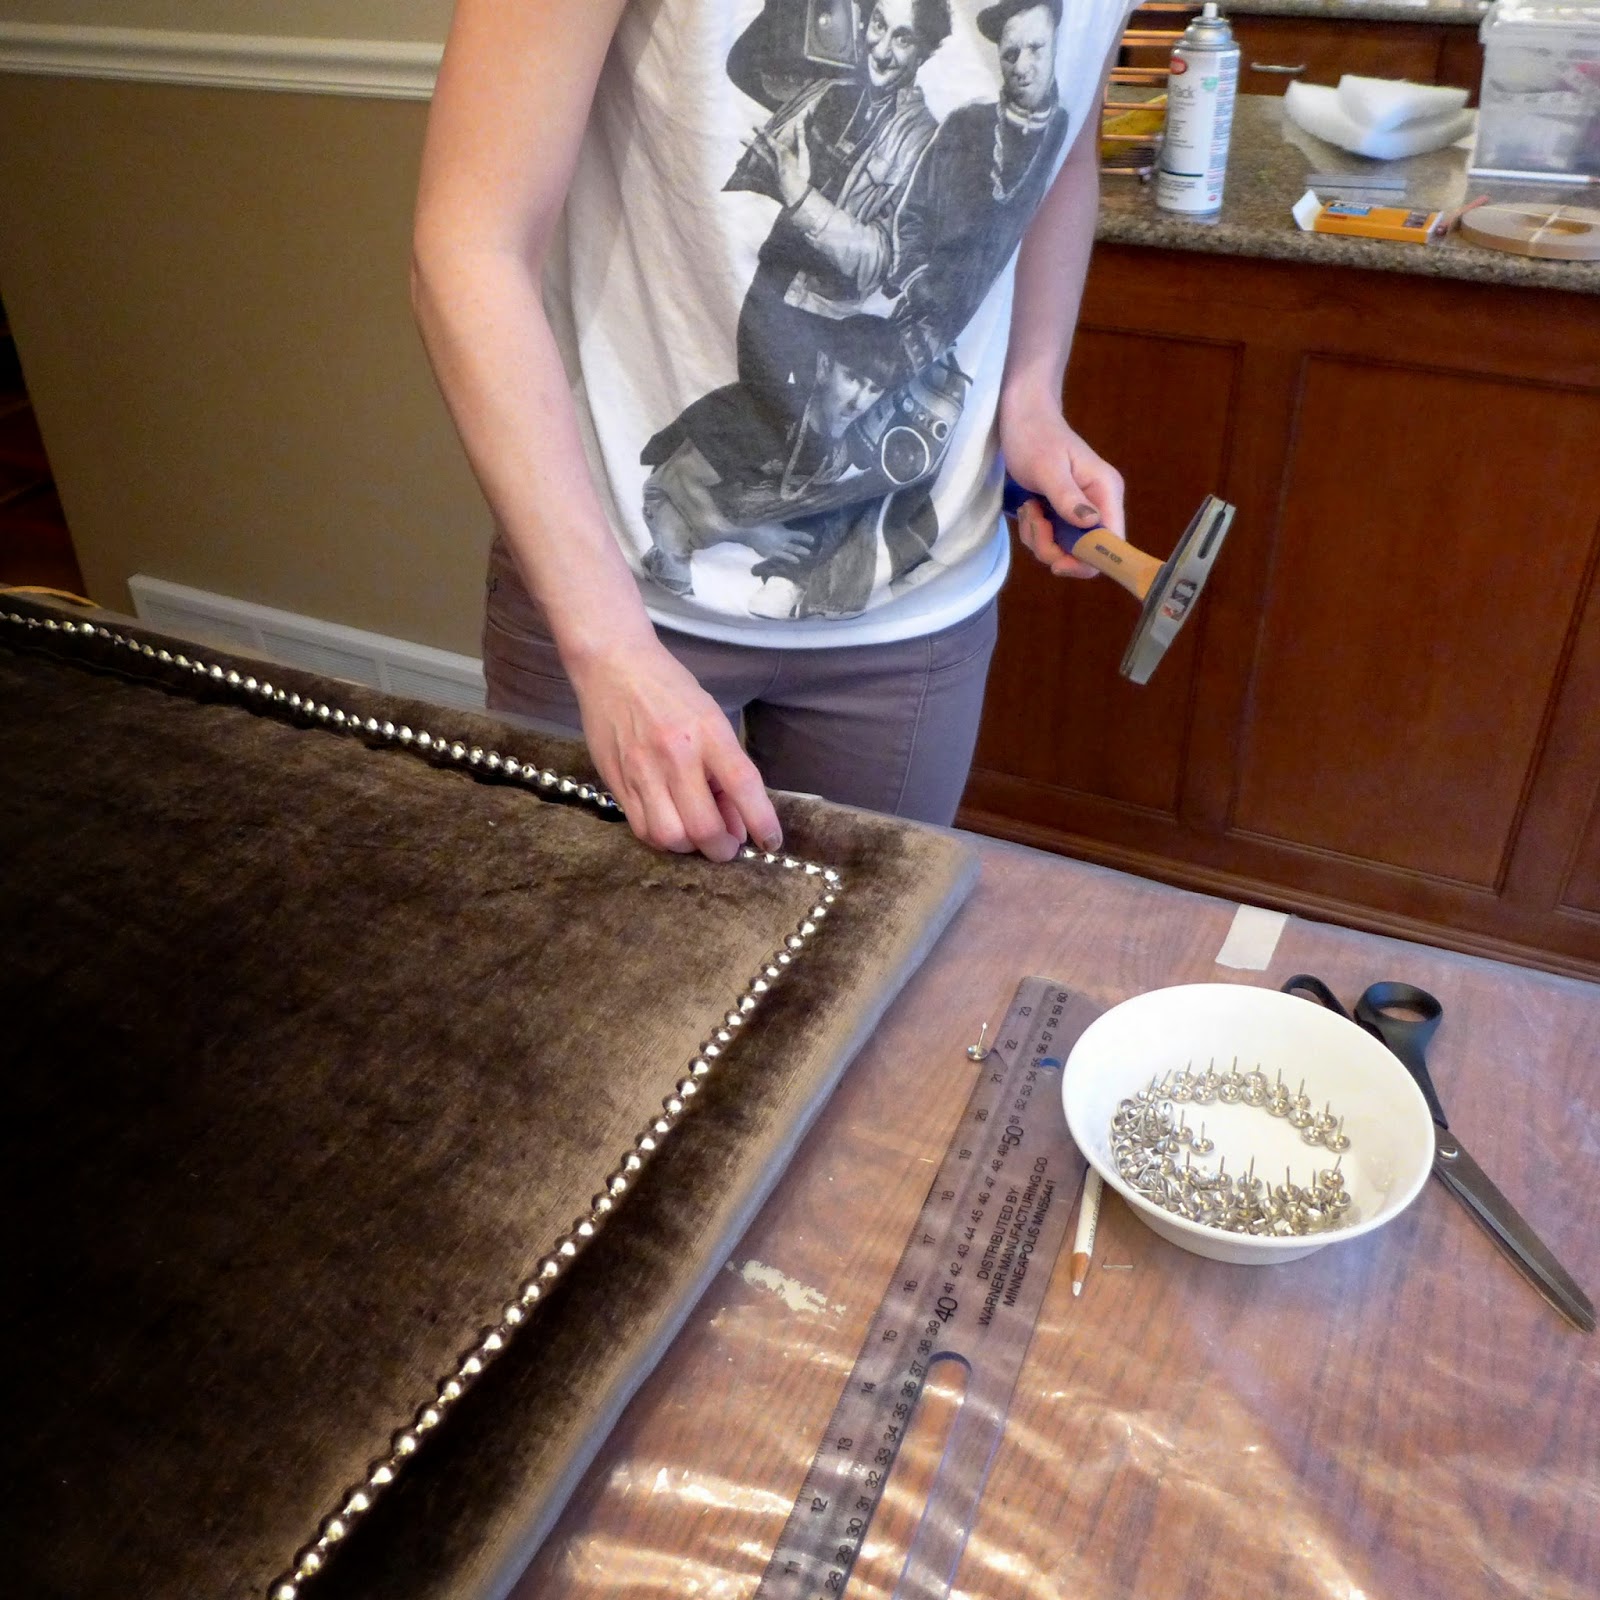
     Here she is working on the, plastic covered, kitchen table.

 The board is on the table. She has laid on the front side of the board, the poly batting. She used a spray adhesive on the board, then laid down the padding, Then it was stapled around the edge of the board.  The padding was trimmed even with the edges of the board.
 Next, the fabric was laid right side down on the table. The board was turned over, with the padding next to the back-side of the fabric. Then the fabric was pulled around to the back of the board and stabled all the way around.  Notice the blue boards.  The top board has an 'angle' cut on it, and a matching board was attached to the wall.  This will be the means of hanging up the headboard.  That extra small blue board was added just as a spacer so that the headboard lays flat against the wall.
 Using a sewing chalk-marking pencil she drew a line 3" in from the edge, all the way around. Next she used the stable gun to place stables right on that line, making the fabric indented.
 In the indentation she laid the nail-head decorative trim. 
 Every three heads there is a hole, and a nail head is pounded in all the way into the board
 Almost done with the trim.
 OK, lets take it to the bed and hang it up! 
Finished!  It really added a nice touch to her bedroom to have a headboard above the bed.  Also, it is nice to lean up against it, while sitting in bed reading or whatever -- softer than propping up against a hard wall.  You did a nice job.  And with it attached to the wall the way it is, one can make any number of these headboards, and change them when you would like different look.


Tuesday, April 8, 2014

The Greatest Sink Ever!

Can't say enough about my choice of a Blanco Diamond Series 60/40 double bowl Silgranit sink.  These are granite composition sinks. Tough, mar-proof, and with the lovely color choices they can coordinate well with counter tops and appliances.  I have just never been a fan of stainless steel sinks.  In time, I have seen them look scratched and dull and show water marks.  Since I had chosen all the other appliances in stainless steel, I thought this brown color would go well with our HanStone Bavaria quartz.  I priced these sinks locally, but they were priced much higher than I could buy it from www.Build.com.  It was shipped very fast and very securely packed, arriving in perfect condition.  I did order from them the accessory, two stainless steel sink racks. They are made to fit perfectly. These are wonderful.  Love the little 'feet' on the bottom of the rack, it keeps the water draining away.  I can set into the sink a hot pan, and this rack helps prevent damage, though these silgranit sinks are very heat resistance to begin with, the rack is just a nice thing to have in the bottom. The center cut-outs are nice too when I need to reach in to remove the strainer basket.  I also ordered the color matched drain baskets. I am very happy with having a deep and large sink. (The left-side one is lower and slightly bigger).  It's great that I can put a large skillet, long handle and all, right on down into the sink.  And so handy that my very large wooden cutting board fits too, making it easy to rinse it off. 
So here she is:


Monday, April 7, 2014

The Kitchen: Before and After

Well, it has been seven months since we first started researching, shopping and making plans for updating our kitchen/dining area.  Here we are, take a little BEFORE and AFTER tour through my photo album.
Many thanks for those who worked on this kitchen: Dan Baisden (Dreamwood Construction LLC) and his helpers, Ben and Tony. Kevin (Dusty) Szarell (Home Logix) who suggested and ordered the custom cabinets from Amish craftsmen at Frease Woodcraft, and for his installation of the tiled back splash and the under cabinet lighting. For the patient help from Laura at Canton Tile Distributors, and Sherilyn from Abbot's Blinds & Window Fashion, Canton.  Over all things went smoothly and the blips here and there, like the hard work it was to remove the many layers of old flooring, and the last minute discovery of leaking old brass pipes barely accessible, down into stud walls in the sink area; that luckily were fixed (by Dusty) the day before the cabinets were to be installed, just made for some good story-telling.  Paul was a big help with cutting all the baseboard, and I enjoyed all the painting, as it sure did freshen up this place.  This winter of 2013-2014 was a snowy and very cold one, and so many times the workers had to trudge through deep snow up the lane and bitter cold to get on the job.  Finishing touches will be deciding on art work for the dining room walls.
Look through my Archives for other projects around the house.
Click here for photos of The Window Treatment.

BEFORE:  (Birch plywood cabinets were 50 years old, the Corian counter-tops 20 years old, flooring 14 years old, the appliances 6-10 years old)
 AFTER: Custom made cabinets by Frease Woodcraft, Fredericksburg, Ohio. KitchenAid appliances, Blanco Silgranit Sink, Flooring-Congoleum DuraCeramic Luxury Vinyl 16x16 tiles grouted, Backsplash-Grazzini Porcelain Tiles, Canton Tile Distributors. Tower Industries-HanStone Quartz counter top, Bavaria, AmeriRock hardware, Lowes, LED, overhead and under-cabinet lighting, Benjamin Moore Matte finish paints-Timson Sand and Brush Beige, and trim Dove White.  Window cornice from Abbot's, Canton, OH)
BEFORE (The stove was on this side - it was moved to opposite side)
and
AFTER (Absolutely love the deep drawers!)

BEFORE: Our galley type kitchen is open-ended. This entrance leads to hallway and the living room.
 AFTER:
BEFORE:
AFTER: (I love having an over-range microwave. We placed it slightly higher so there would be plenty of space to work at the stove. Moving the refrigerator to the opposite wall made for a sleeker profile. And we were so pleased that the cabinets were extended down at the end, giving additional storage space in this small kitchen)
BEFORE - The sink, was an almond colored, cast-iron, top mounted. The srcolling- oh so 60's-70's!)
AFTER: (The sink. Now a brown, Blanco Silgranit, undermount. LED 3-light adjustable track type over sink)

The backsplash - Grazzini Porcelain 6x6 tiles set in diamond pattern, LED bar under-cabinet lighting.
BEFORE: (cabinets were very low, with a 12"overhead sofit. a blocked view of the dining area.  Though I wanted to "open up the area" I really hated the thought of getting rid of these cabinets, as it was a major portion of my small-kitchen storage. But the designer at Frease suggested having shorter cabinets)
AFTER: (Sofit removed. Short cabinets added. So now we have a view into the dining. And the coffee-bar is nice, and the supplies handy in the cabinet above)
BEFORE: (View as seen from the dining area into the kitchen. Yes, those cabinets opened from both the kitchen side and the dining room side. But honestly, rarely if ever used the cabinet door openings on the dining room side. So for me that wasn't important to retain that)
AFTER:See how nice it opened up the whole area. The flooring is terrific! It doesn't show ANY dirt and crumbs, almost scary, as I know it MUST be time to sweep, but nothing hardly shows up, except when my dust pan proves otherwise! Then I exclaim - wow - I didn't realize the flooring was hiding the crumbs and dirt so well!  It looks and feels like slate or ceramic tile. And nothing breaks when it falls to the floor, plus it is quiet and warm to walk on. Congoleum's  DuraCeramic.
 BEFORE: (15year old wallpapered walls and pony-wall room divider. This dining area is small and cramped and with six chairs more so. A smaller table/chair set would be better, but so nice to have this table and two leaves to expand for family visits and company.  So for now, we keep it.)
AFTER: (Pony-wall removed, painted woodwork, cornice window treatment. With the wall removed it will not be quite so cramped with the table is extended out. We do like this 'open concept' that it has now. Wall art and decorations will be added in a few weeks)
 BEFORE:
AFTER:
 BEFORE: (A ceiling fan light fixture was removed and replaced.
AFTER: In the living room the carpeting (45 years of carpeting!) was removed and the red oak floors were refinished. Follow that project over in the Archives.
And finally, here's the Living Room  - completes this tour.
Now, click here to see The Cornice Window Treatment
DEO GRATIAS, always!


Saturday, April 5, 2014

A Cornice Window Treatment

I chose to place an upholstered cornice for the 96" long kitchen/dining window.  For quite some time I was thinking I would make a Roman Shade for this window.  But upon the suggestion of Sherilyn  who came to the house from Abbot's Blind & Window Fashion, Canton, OH, I went with an upholstered cornice.  I could still install pull down shades (perhaps those Solar Shades?) under the cornice.  However, we do like the natural light that comes in from this window and will leave it like this for now. The geometric pattern of diamonds in the fabric accents nicely with the diamond pattern of the way the porcelain tiles were set in the kitchen back splash. I must say that I have in all the 49 years sewn my own window treatments, be it valances, drapes, curtains, shades. Thinking it would be neat to have a decorator stop by and take a look after all, 'no obligation' for the them to come into the house. I called in this gal from Abbot's and she brought along all these beautiful fabrics and had all these wonderful suggestions --- I was at the stage in this remodeling project -- I just wanted to GET IT DONE.  So in a crazy spending moment I signed on and had the professionals do it for me.  
CLICK on the picture collage below to enlarge:

Wednesday, March 12, 2014

A View of The Dining & Living Room

Still have to do some decorating of the walls, and some baseboards to finish putting back on.  I am putting a Cornice window treatment over the Kitchen window with possible hidden blinds behind it.  But here is a peek at how it looks with it's new 'open concept' now that the room divider pony-wall had been taken out.  Click on photos to enlarge.


Counter Top and Appliances

Things are moving along!  The quartz counter tops were installed and all the appliances are working.  I have begun to move things upstairs from the basement back into my lovely new cabinets. Finally can cook some meals.  Next up:  The porcelain tiles back splash and the Xeon under cabinet lighting. Tiles are on order from Canton Tile Distributors. Installation around March 20th. THEN the kitchen part will be finished. We have some baseboards to finish in the kitchen and dining area yet.
 

 I can not say enough great things about my KitchenAid Induction Cooking Surface range! Never going back to another type of cooking. So fast and responsive, and absolutely nothing sticks to the surface. Energy efficient.  First time I've had an over range microwave.  I like it.  We had it installed just slightly higher than most. 

I LOVE, love, my new Blanco Silgranit Diamond series 64/40 sink! I ordered it from www.Buildcom. They have great prices on everything. I am loving the stainless steel grates in the bottoms too. Well worth it to add those. They have little 'feet' on the bottom and so the grate sits up just slightly off the bottom of the sink. Also purchased the matching color drain baskets. I am very pleased with the size of the larger of the two bowls. Big pans with long handles fit down in it making clean-up easy. In the area behind the sink (picture below) we are having a decorative addition in that space.  It will be of the same tile but just different size tiles laid in different direction so as to give a 'framed in' picture like look. That should give it a little interest over that large space. The wires hanging down are for the under cabinet lighting.


Have placed my coffee maker under that longer cabinet next to the refrigerator. All the coffee suppies handy right above it. 
 Things will look a lot different with the back splash tiled and under cabinet lights! In the meantime before that is done, it has been great to play in my new kitchen.
Here is the sample board we picked our tile from, a porcelain tile by Gazzini.